This example illustrates how on-delay, off-delay and alarm dead bands can be used to reduce the number of alarms that are generated / reported (see 5.8). It also illustrates how ReAlarmTime is used to bring an alarm back up to an active state (see Figure B.4).
Some process values may have sudden jumps that are very brief and do not constitute an alarm. For example, a motor on start draws a large current, but quickly come back down. This is a normal motor current load, and should not be alarmed, but a sustained current load is a problem and should be alarmed, by configuring a OnDelay time, the momentary spike will not generate an alarm, since the value has to be above the alarm threshold for the duration of OnDelay.
An AlarmDeadband is used to keep a noise signal from generating multiple Alarm activations a signal once it crosses an alarm limit will not return to norm unless it drops below the limit by the amount of the deadband specified. In the example the process value is jumping up and down around the limit, but the alarm just remains in the same active or acknowledged state. The Alarm can have a deadband for each limit (High vs HighHigh) and these deadbands can be different.
The OffDelay can also be used, much as the OnDelay, except it will keep a Value in alarm even if it drops below a limit, but only very briefly. Again, this setting is used to limit the number of alarms that occur in a system.
The ReAlarmTime is used to ensure that actions are taken to correct the issue that generated an alarm. Some alarms are configured to generate a new alarm if they have been in an active state for the ReAlarmTime period. The Alarm, goes back to an Unacknowledged state, as if it had just occurred.
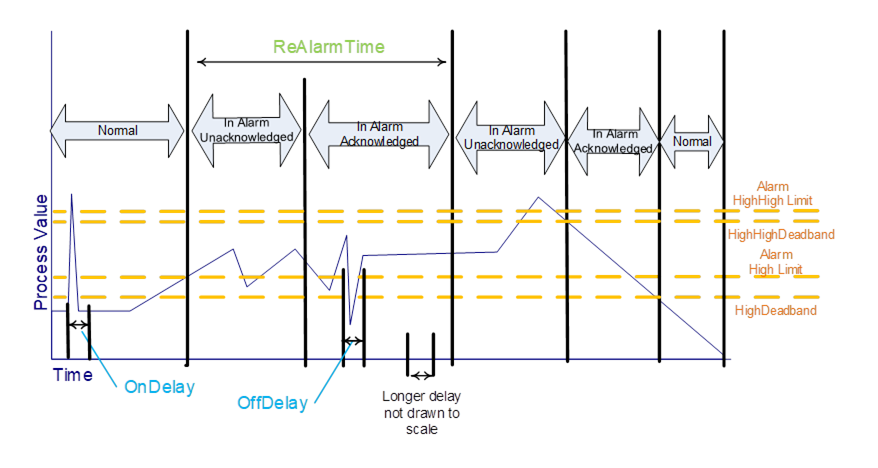
Figure B.4 - Alarm example - On Delay, Off Delay, ReAlarmTime